Vaultwarden, formerly known as Bitwarden_RS, is a self-hosted password manager that allows you to store and manage your passwords securely. By installing Vaultwarden, you can have your own personal password manager that you control.
In this blog post, I’ll guide you through the process of installing Vaultwarden on a Raspberry Pi using Portainer and show you how to set up the mobile client and browser extension for Vaultwarden.
Prerequisites Link to heading
- Raspberry Pi 4 setup and updated
- Portainer installed
- Nginx Proxy Manager service installed
Step 0 - Define local mount folder Link to heading
Service will use local folders, mounted to docker container, to store its data.
For service we will need to create folder:
- /ssd/vaultwarden/data
mkdir -p /ssd/vaultwarden/data
Step 1 - Install Vaultwarden Link to heading
With Portainer installed, it is possible to start Vaultwarden stack. To do this, follow these steps:
- Open Portainer in your web browser and navigate to the “Stacks” page
- Click the “Add stack” button
- Enter a name for the stack (e.g., “vaultwarden”) and paste the following code into the “Web editor” section:
version: '3'

networks:
  intranet:
    external: true

services:
  server:
    image: vaultwarden/server:latest
    container_name: vaultwarden
    restart: always
    volumes:
      - /etc/localtime:/etc/localtime:ro
      - /ssd/vaultwarden/data:/data/:rw

    ports:
      - "8081:80"
    networks:
      intranet:
        aliases:
          - vaultwarden
    environment:
      WEBSOCKET_ENABLED: "true"
      SIGNUPS_ALLOWED: "true"
Step 2 - Configure Vaultwarden Link to heading
Once the Vaultwarden container is running, you can access the web interface by navigating to http://<homelab>:8000.
The first time you access the web interface, you’ll be prompted to create an admin account and set up your vault. After you create an account, you can start using Vaultwarden to securely store and manage your passwords.
See the vaultwarden wiki for more information on how to configure and run the vaultwarden server.
Step 3 - Configure Proxy Link to heading
Now your Vaultwarden is accessible on http://<homelab>:8000. Such URLs with port number do not look too friendly. However, there should be Nginx Proxy Manager installed and running already, if followed Homelab. Proxy. It allows to create proxied hosts and assign them nice names:
- Add new Proxied Host
- Fill required information
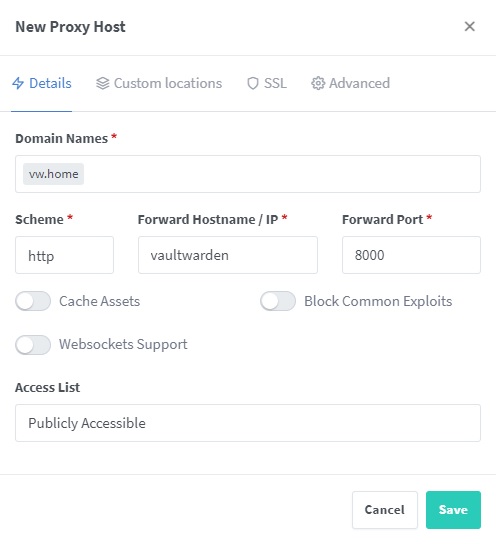
- Domain names. Assume router is configured to pass domain
hometo homelab. Then, lets assume vaultwarden should be a subdomainvw. Then define domain namevw.home. It is possible to assing multiple domain names - Forward hostname. Both services - vaultwarden and nginx proxy manager are connected to the same network
intranet. Thus we can use alias defined to access them. Definevaultwarden - Forward port. As defined in stack, vaultwarden should listen on port
8000.
- Domain names. Assume router is configured to pass domain
Proxy Host configuration should look like:
Step 4 - Set Up the Mobile Client Link to heading
To access your Vaultwarden vault on your mobile device, you can download the Bitwarden mobile app:
Enter your Vaultwarden URL and admin token when prompted.
Step 5 - Set Up Browser Extension Link to heading
To use the browser extension, you can download the Bitwarden browser extension:
Enter your Vaultwarden URL and admin token when prompted.
TO BE CONTINUED… Link to heading
And that’s it! You now have your own personal password manager running on your homelab.
In the following post Homelab. Gitea, I will describe how to install Gitea - a self-hosted Git service that provides a web-based interface for managing Git repositories. It will allow keep source codes for your projects on your own territory.