Nginx Proxy Manager is a web-based tool that provides an easy-to-use interface for configuring and managing reverse proxies. It’s designed to work with the Nginx web server, which is a popular choice for serving web applications and websites. With Nginx Proxy Manager, you can set up and manage reverse proxies for multiple applications or websites from a single interface.
In this blog post, I’ll guide you through the process of installing Nginx Proxy Manager on a Raspberry Pi, assuming that server is already prepared as described in Homelab. Preparation. Thus you should have Portainer already running.
Prerequisites Link to heading
- Raspberry Pi 4 setup and updated
- Portainer installed
Step 0 - Define local mount folder Link to heading
Service will use local folders, mounted to docker container, to store its data.
For proxy service we will need to create folders:
- /ssd/proxy/mysql
- /ssd/proxy/data
- /ssd/proxy/certs
mkdir -p /ssd/proxy/db
mkdir -p /ssd/proxy/data
mkdir -p /ssd/proxy/certs
Step 1 - Install Nginx Proxy Manager Link to heading
Create a new stack in Portainer and copy following code into it
version: '3'

networks:
  intranet:
    external: true

services:
  app:
    image: 'jc21/nginx-proxy-manager:latest'
    restart: unless-stopped
    ports:
      - '80:80'
      - '81:81'
      - '443:443'
    networks:
      intranet:
        aliases:
          - proxy
    volumes:
      - /ssd/proxy/data:/data
      - /ssd/proxy/letsencrypt:/etc/letsencrypt
In this stack definition volumes section binds local folders into container. /ssd in this example is a mount point of SSD drive.
Start stack and access Nginx Proxy Manager admin UI on http:\\<homelab>:81
Default credentials:
Email: [email protected]
Password: changeme
Step 2 - Configure proxy Link to heading
On first login you will need to update credentials and then it is possible to proceed with configuring hosts.
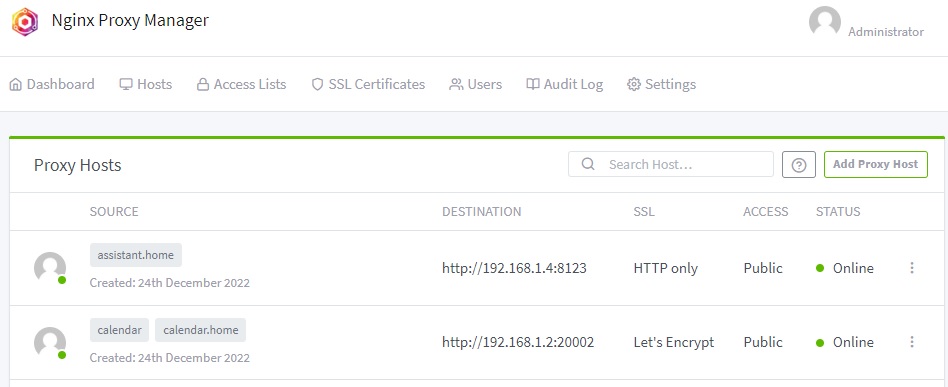
For every service you want to make a proxy - create a new record under Proxy Hosts. Minimal configuration to be defined:
- Domain Name - names to be redirected to service
- Schema - http / https
- Forward Hostname - IP address of the service
- Forward Port - service port
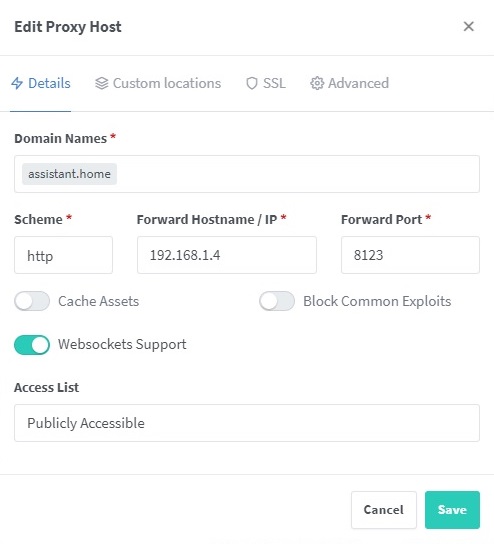
Service can have IP address different from homelab service IP. For example, it is possible to create proxied hosts entries for services installed on NAS, or on the internet.
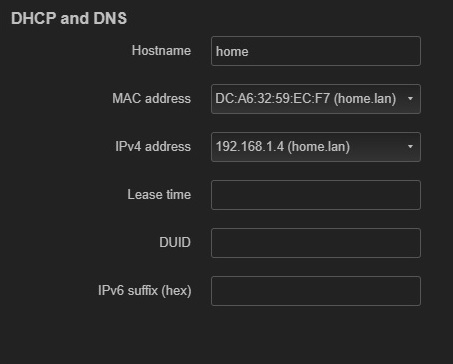
Step 3 - Configure router Link to heading
If you want to have homelab services accessible as subfomain of some base domain - you router should know to reach it. Configuration depends on exact router. For example, with OpenWRT it can be done under Network > DHCP and DNS > Static Leases. Add and entry that will map specific DNS name to homelab IP. For the simplicity, in following posts lets assume that homelab server is mapped to DNS name home.
TO BE CONTINUED… Link to heading
By this moment, you should have a configured Raspberry Pi 4 with Nginx Proxy Manager ready for installing homelab services and assigning frinedly URLs to them.
In the following post Homelab. Vaultwarden, I will describe how to install Vaultwarden - a self-hosted password manager that allows you to store and manage your passwords securely. It will allow to generate and use complex passwords not only for homelab services, but can be used as general password manager.